I have had several requests on where I got the Precious Moments images to do Print n Cut with.
Here is the link.
http://thehattie1.tripod.com/index-10.html
Thursday, December 30, 2010
Print n Cut
My Print n Cut Directions for Make The Cut and the Expression
This is what works for me. Leave me a comment with your e-mail address if you need yours tweeked.
Print n Cut with the Expression
Prep
1. Save your image.
2. Print your Image on White Cardstock (I use the 8x10 packs from Walmart)
3. Go to settings button . It is to the right of the LCD display, bottom row , first button on the left.
4. Use the arrow (+) (-) under LCD to make your selections.
5. Press OK to select.
6. Select Inches-1/10ths.
7. Press settings button to save and exit.
8. Set Expression on Portrait mode.
Print n Cut
1.Open MTC and set to Portrait, Uncheck Outline Shapes, set mat to Contrast Click View at top go to Printer Options and click Set Print Lines.
2. Use Pixel Trace to bring in image, press Set Image as Texture, set threshold to get a solid outline, Click Import
3.Click on the graphic to select it then press blackout at the bottom or through Edit >Shapemagic
4.Use Shapemagic to add a shadow, change the color close to your graphic color.
5. Click on Image to select the graphic and put the 1st gray dotted line on the corner of the 1inch square. Selection Properties Box at the top right should read X 1.0and Y 1.0
6. Line up paper exactly on mat edge
7. Load mat close to blade side along that extra line on Expression to be consistent.
8. Close the eye of the shadow layer and press the Scissors on MTC.
This should be very close and may cut some of your shadow but that should blend in. If you are off e-mail me and I will send you directions for adjusting. If you do not have Make The Cut click in the link on my sidebar and download it for free and try it out. So many free options will be opened up for you to create.
Wednesday, December 29, 2010
Tuesday, December 21, 2010
Christmas Ornaments and Coasters
 |
| Pledge Future Shine floor polish/MS glitter/Vinyl w/MTC |
Printed Tissue Paper photos put on w/Modpodge/Top one framed w MTC snowflake frame


 |
| Heartsdelight font (free) cut with Make The Cut |
Wednesday, November 10, 2010
Monday, October 25, 2010
Setting Chart Notes
*All Blade settings are for the Standard blade unless DC is noted for the Deep Cut blade. MC is for the number of multi cuts.You may need to make slight adjusts for your Cricut. I cut these out and tape them directly on my machine.Just right click on the chart and save target as...then print.
Sunday, October 24, 2010
Sunday, May 16, 2010
Sunday, April 25, 2010
Thursday, April 22, 2010
Cricut Girl
I was just chosen to have the chance to go to L.A. for Cricut training to be a demonstrator at Michaels. Whoo Hoo I am so excited. How cool is that to get paid for what you love to do!
Sunday, April 11, 2010
Link to PDF file of pages from handbook 6 per page
I Keep a binder of these because they are easier to see. On some I use the number method to then correspond to the overlay since they are sometimes very hard to see.
http://www.mediafire.com/?sharekey=7832315ad3a0af34ed24a2875c7fa58ee04e75f6e8ebb871
or
http://www.cricut.com/messageboard/tm.aspx?m=3865566&mpage=1&key=�
http://www.mediafire.com/?sharekey=7832315ad3a0af34ed24a2875c7fa58ee04e75f6e8ebb871
or
http://www.cricut.com/messageboard/tm.aspx?m=3865566&mpage=1&key=�
Monday, March 29, 2010
The Beach is cut out tags w/ cut out letters made into shaker boxes with sand and small shells.
Waves are hand cut vellum.
Waves are hand cut vellum.
Did I tell you how much I love, love, love Stickles. My DH made me this great Stickles shelf to go with my Jet Max's. They hold 36 and are $20.00 plus shipping if you would like one. No more air globs....
Tools:
Used acetate clamshell packing
Large Marvy round scallop punchCuttlbug and floral embossing folders
Stamps and Stazon
2 Brads/2 Prima Flowers/Stickles
MS Border punch
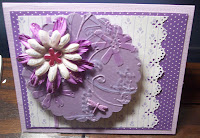
The scalloped circle was punched out of cardstock and acetate and they are both embossed and bonded together with the brads.
Sizzix Flower
I Top Brad
Smooch
Blue dry wall tape
Sizzix Dot Embossing Folder
Homemade Scents
Recipe:
Small mister bottle from travel section at Walmart
Fill bottle 1/8 full of vodka add several drops of essential oils add distilled water to top. Shake and let sit overnight. Shake each time you use. Spray something on card and envelope and put card in a zip lock bag for up to a week. I have mailed cards that took a week to get there and they still had the scent.
Walmart has economical essential oils.
Chip Board spayed w/ homemade Shimmer Mist
Recipe:
Tim Holtz Mister Bottle (comes is pack of 3)
Fill one third rubbing alcohol then fill with water up to top 3/4 inch. ( leave room to shake)
Then add drops of any Tim Holtz alcohol ink and popcicle stick tip of any color you perfer of Perfect Pearls. Shake every time you use and mist away...It is good for flowers too.
Saturday, March 27, 2010
Cricut Abbreviations
Here is a link to Cricut Abreviations
http://www.cricut.com/messageboard/tm.aspx?m=1871024
http://www.cricut.com/messageboard/tm.aspx?m=1871024
Wednesday, March 24, 2010
Cards with embossed acetate...


Tools used
Cuttlebug/Embossing Folders
Stickles
Two Brads/hole piercer
Large Marvy scalloped round punch
Ribbon
Two Prima Flowers
MS punch
Stazon Ink/Stamp
Subscribe to:
Posts (Atom)


